Install Windows 10 with full UEFI Support on a USB-Flash Drive

To be sure you install Windows 10 with UEFI mode instead of Legacy mode you can create two partitions on your usb-flash drive.
This only works on Windows 10 v.1607 or newer versions of Windows 10, yes of course it works on most Linux based dist.… 🙂


In Diskpart you can do this two ways.

Choose option one if you need to be able to see the big partition (Partition 1) in earlier Windows versions.
Start Diskpart as admin.

LIST DISK
SELECT DISK <disk number> (your usb-flash drive)
CLEAN
REM === Create the Other files partition. ===
CREATE PARTITION PRIMARY
SHRINK DESIRED=1000
FORMAT QUICK FS=NTFS LABEL=DEPLOY
ASSIGN
REM === Create the Windows PE partition. ===
CREATE PARTITION PRIMARY
FORMAT QUICK FS=FAT32 LABEL=BOOT
ACTIVE
ASSIGN
EXIT

Now it should look like this in highlight.

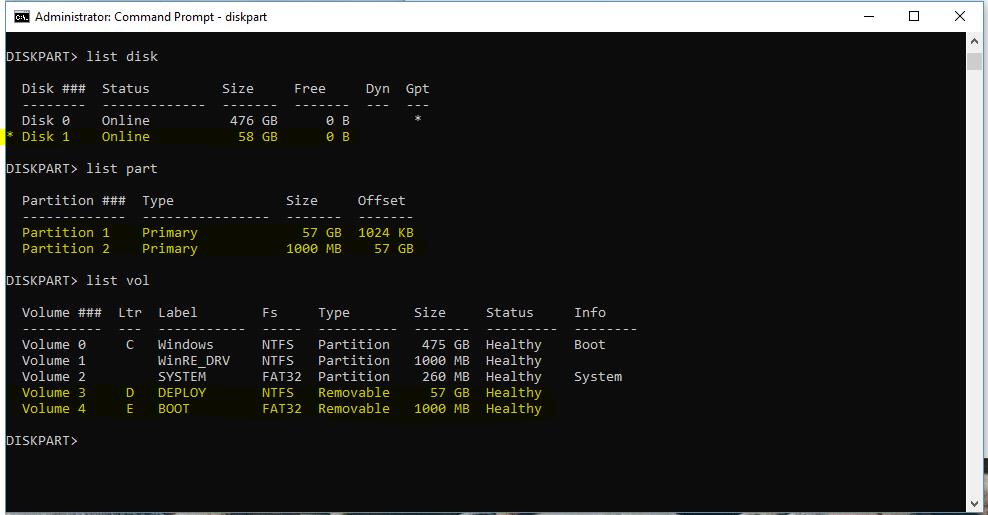
As you can see in option one, the boot partition has number 2. But remember that it has nothing to do in boot scenarios.


Choose option two if you dont need to see the big partition (Partition 1) in earlier Windows versions.
Start Diskpart as admin.

LIST DISK
SELECT DISK <disk number> (your usb-flash drive)
CLEAN
REM === Create the Windows PE partition. ===
CREATE PARTITION PRIMARY SIZE=1000
FORMAT QUICK FS=FAT32 LABEL=BOOT
ASSIGN
ACTIVE
REM === Create the Other files partition. ===
CREATE PARTITION PRIMARY
FORMAT QUICK FS=NTFS LABEL=DEPLOY
ASSIGN
EXIT

Now it should look like this in highlight.

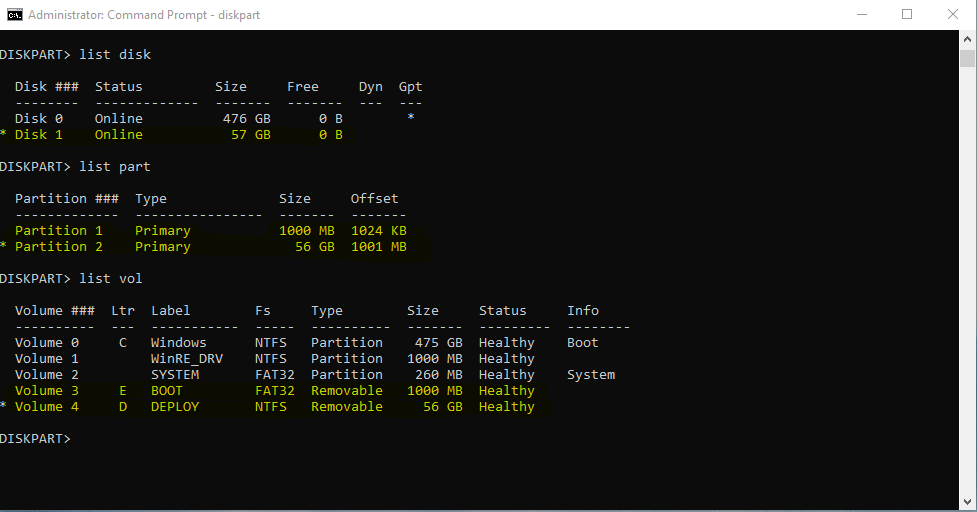
As you can see in option two, the boot partition has number 1. But remember that it has nothing to do in boot scenarios.

Replace Lockscreen and Wallpaper in Windows 10

Rename your Background/Wallpaper you like to use for your deployment to Wallpaper.jpg and copy the Wallpaper.jpg to your MDT “scripts” folder.


Now add Powershell and .NET support to your WinPE image.


Then add an Command Line in the TaskSequence like this and copy the text below inside the Command Line like this.
powershell.exe -ExecutionPolicy “ByPass” -Command “Get-ChildItem \”%OSDISK%\Windows\img*.jpg\” -Recurse | % { Copy-Item \”%SCRIPTROOT%\Wallpaper.jpg\” $_.FullName -Force -Verbose }”


It is basically replacing all of the built-in Out of box wallpapers with my wallpaper.

Media not found “Please reinsert the media (CD, DVD, or USB) needed to complete the deployment.”

If you are using MDT and have created a Offline USB-drive Media for your Windows install, then this screen can appear because of the delay from Device Manager and the hardware scan to find the USB controller when the computer restarts.


Hold your horses, there is a workaround… !!


The workaround is to put a delay in the Litetouch.wsf script, presented below.
Copy the code below and put it into your Scripts\Litetouch.wsf:
‘//—————————————————————————-
‘// FIX for locating USB Deployment Media
‘//—————————————————————————-
‘Delay search for media 10 seconds.
Wscript.Sleep 10000
‘Device Manager action: Scan for Hardware …
sCmd = “c:\Windows\System32\rundll32.exe cfgmgr32.dll ,CM_Reenumerate_DevNode”
‘Delay for 5 seconds to allow hw to ennumerate
Wscript.Sleep 5000