Change network location type (Public or Private) in Windows 10

Settings UI and the Network flyout is completely different from Windows 7 and Windows 8.1. The options have been moved around and it is not clear how to change the network type – private or public. I would like to share how you can change the network location type in Windows 10.

When you are signing in to your account for the very first time, Windows 10 asks you which kind of network you are connecting to: Home or Public.

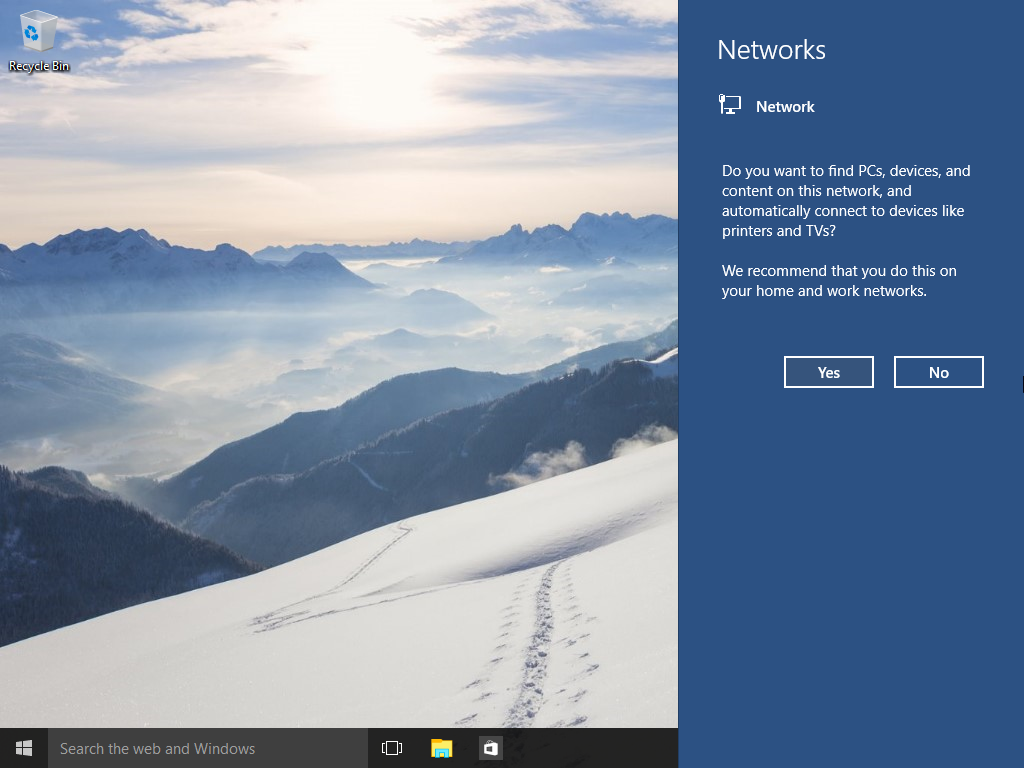
If you pick Yes, the OS will configure it as a private network and turn on network discovery. For a Public network, discovery and access will be limited. If you need to access your computer from a remote PC or browse the PCs and devices on your local network, you need to set it to Home (Private).

If you decide later to change the access type of the network you are connected to, you might even not find which settings to change!

There are two ways to change the network type in Windows 10.

Method one. Change network access type via the Settings app

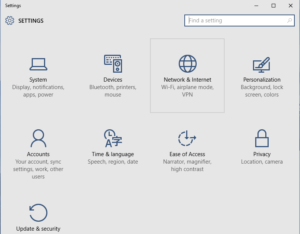
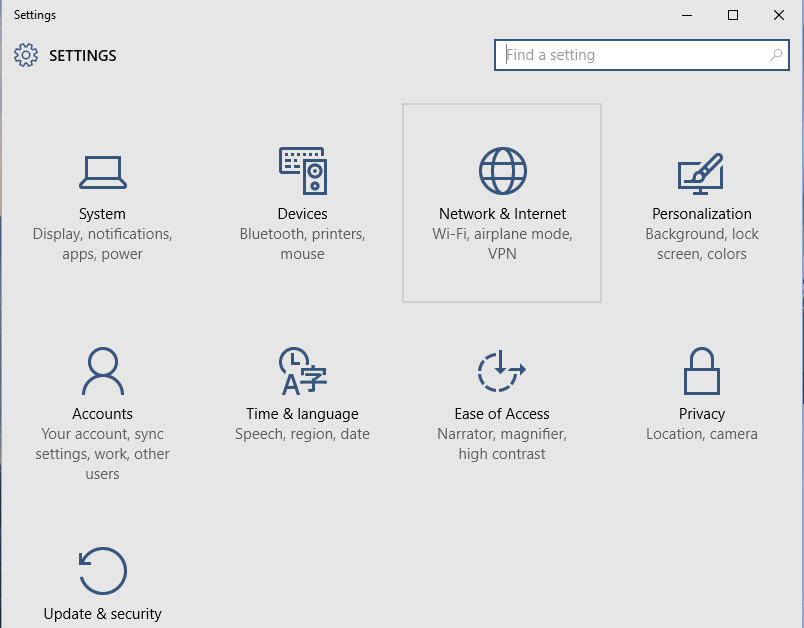
  1. Open the Settings app.
  2. Click the Network and Internet icon.
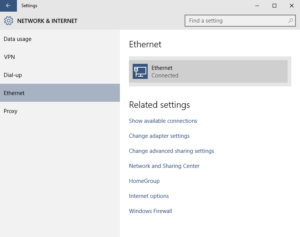
  3. Depending on the way you are connected to your network, you need to click the appropriate subcategory on the left. If you are using a wired connection, click on Ethernet. If you are using some wireless connection, click on Wi-Fi.
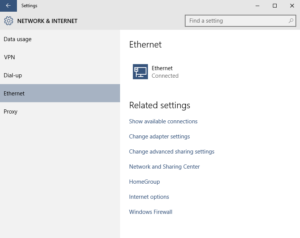
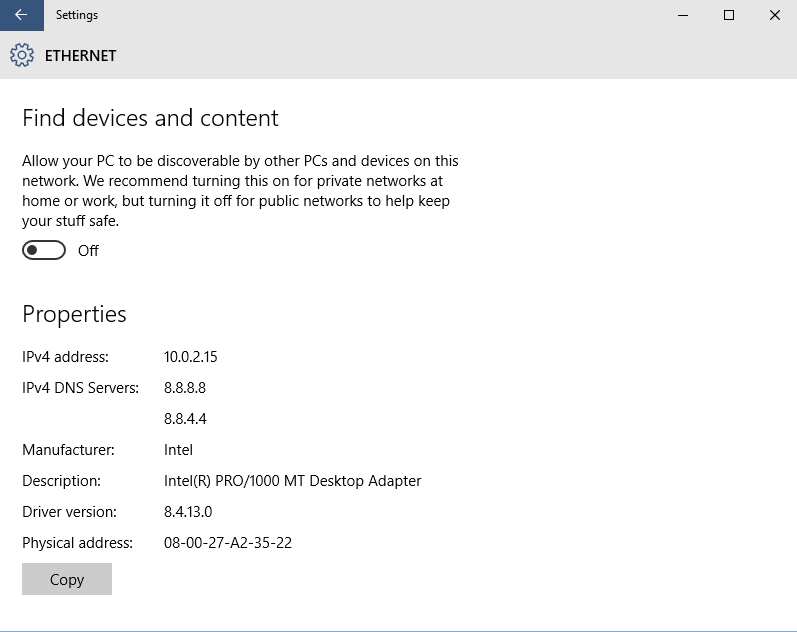
  4. Click on the connection name on the right. In my case, it is named just “Ethernet”
  5. On the next page, turn on the switch Find devices and content to make this connection Private. If you turn off this switch, this will make your network Public.

That’s it. This is pretty easy, isn’t it? This is all you need to know in the Settings app to change the network location type.

Method two. Change network access type by Registry editing

You can change the network profile in Windows 10 using a Registry tweak. After you follow the steps described below, you can easily switch your network location type from Public to Private and vice versa.

  1. Open Registry Editor.
  2. Go to the following Registry key:
    HKEY_LOCAL_MACHINE\SOFTWARE\Microsoft\Windows NT\CurrentVersion\NetworkList\Profiles
  3. You will see one or several GUIDs there, each of them represent a network you are connected to. See the following image to understand how it works:
  4. Go to the GUID subkey which matches your current network connection.
  5. Create a new DWORD value there, named Category. You might already have such a value, so you will only need to modify it.
  6. Set the Category parameter to one of the following values:
    0 – means your network is public.
    1 – means your network is private.
  7. Create a new DWORD value named CategoryType if it does not exist and set its value to 0:
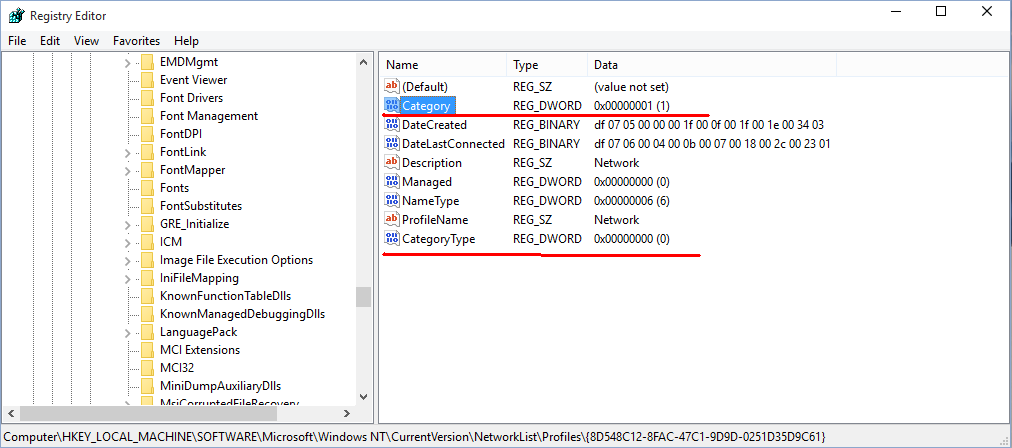
  8. Restart your PC.

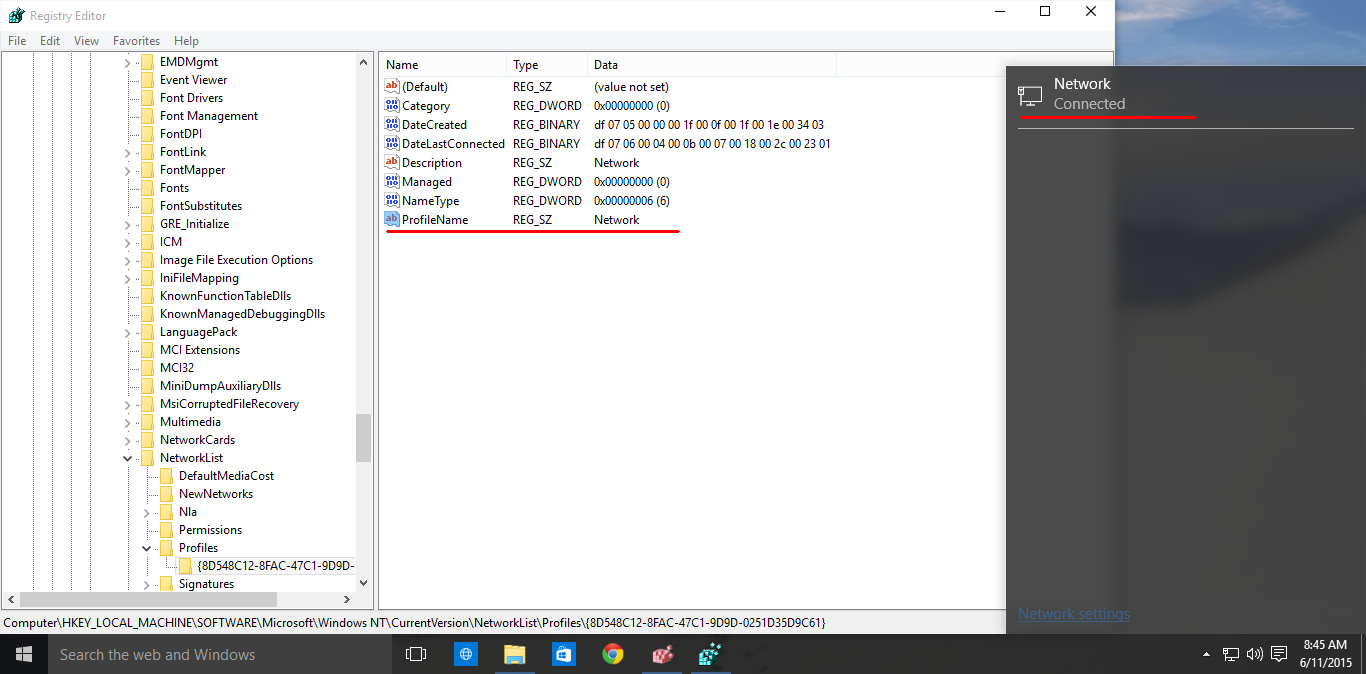
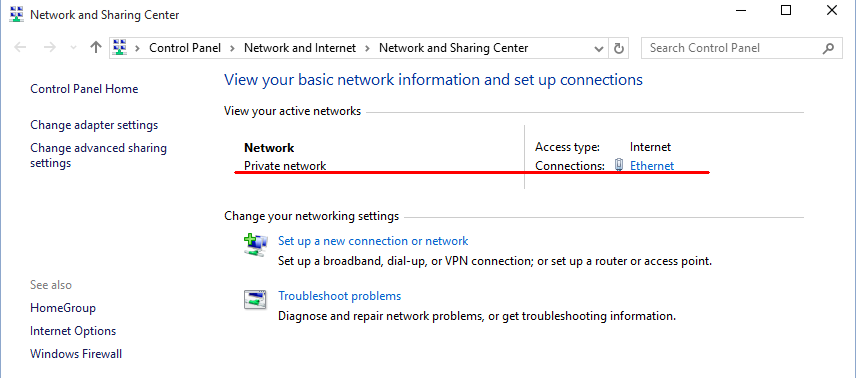
After the reboot, open the Network and Sharing Center and check out the state of your network. It should reflect the changes you made. For example, I set my Network to Private using the following values:

Category = 1
CategoryType = 0.


ASUS RT-AC5300 Router with Telia IPTV

Often with ISP they can deliver some sort of IPTV service and they often deliver a cheap basic router from and of course is that not what we want! We want to use our own consumer router with IPTV and that gives people headache. 🙂

I got an ASUS RT-AC5300 Router and running Swedish Telia IPTV model Arris VIP 4302. This is how I configured my router for Telia IPTV.

I tried to enable “DHCP Routes” with Microsoft profile, but I didn’t got it to work. Hmm… some day perhaps I will try again.

But still very simple and painless.

PXE Error 0xC0000001

Getting PXE Error 0xc0000001 when trying to PXE-Boot a computer with Windows Deployment Services(WDS)?!

Open Windows Deployment Services via MMC.
Expand Servers in the left pane
Right click on the WDS server and select Properties.

Go to TFTP tab and uncheck the box for Enable Variable Windows Extension.

Restart the WDS Server(Task) and try PXE-Boot the computer again.

Ps. Someone, somewhere wrote in a forum that changing the Maximum Block Size to 8192 or 16384 could also help, but it didnt work for me.

Install Windows 10 with full UEFI Support on a USB-Flash Drive

To be sure you install Windows 10 with UEFI mode instead of Legacy mode you can create two partitions on your usb-flash drive.
This only works on Windows 10 v.1607 or newer versions of Windows 10, yes of course it works on most Linux based dist.… 🙂


In Diskpart you can do this two ways.

Choose option one if you need to be able to see the big partition (Partition 1) in earlier Windows versions.
Start Diskpart as admin.

LIST DISK
SELECT DISK <disk number> (your usb-flash drive)
CLEAN
REM === Create the Other files partition. ===
CREATE PARTITION PRIMARY
SHRINK DESIRED=1000
FORMAT QUICK FS=NTFS LABEL=DEPLOY
ASSIGN
REM === Create the Windows PE partition. ===
CREATE PARTITION PRIMARY
FORMAT QUICK FS=FAT32 LABEL=BOOT
ACTIVE
ASSIGN
EXIT

Now it should look like this in highlight.

As you can see in option one, the boot partition has number 2. But remember that it has nothing to do in boot scenarios.


Choose option two if you dont need to see the big partition (Partition 1) in earlier Windows versions.
Start Diskpart as admin.

LIST DISK
SELECT DISK <disk number> (your usb-flash drive)
CLEAN
REM === Create the Windows PE partition. ===
CREATE PARTITION PRIMARY SIZE=1000
FORMAT QUICK FS=FAT32 LABEL=BOOT
ASSIGN
ACTIVE
REM === Create the Other files partition. ===
CREATE PARTITION PRIMARY
FORMAT QUICK FS=NTFS LABEL=DEPLOY
ASSIGN
EXIT

Now it should look like this in highlight.

As you can see in option two, the boot partition has number 1. But remember that it has nothing to do in boot scenarios.

Disable windows driverupdates and driversearching

Open registry editor and change this dword value from 1 to 0 like the image below. [HKEY_LOCAL_MACHINE\SOFTWARE\Microsoft\Windows\CurrentVersion\DriverSearching]
“SearchOrderConfig”=dword:00000000

and then you can do this, just to be sure… ??

Click Start, right-click Computer, and then click Properties. (Windows 7)
Click on Start, search for “View advanced system settings”. (Windows 10)
On the System Properties dialog box, click the Hardware tab, and then click Device installation settings.
Select No.


And then Save Changes.

and then this…

Open Group Policy Management Editor(gpedit.msc).
In the navigation pane, go to Computer Configuration\Administrative Templates\System\Internet Communication Management\Internet Communication settings.
In the details pane, double-click Turn off Windows Update device driver searching.
To turn off searching Windows Update, click Enabled.


Click OK to save your settings.

Replace Lockscreen and Wallpaper in Windows 10

Rename your Background/Wallpaper you like to use for your deployment to Wallpaper.jpg and copy the Wallpaper.jpg to your MDT “scripts” folder.


Now add Powershell and .NET support to your WinPE image.


Then add an Command Line in the TaskSequence like this and copy the text below inside the Command Line like this.
powershell.exe -ExecutionPolicy “ByPass” -Command “Get-ChildItem \”%OSDISK%\Windows\img*.jpg\” -Recurse | % { Copy-Item \”%SCRIPTROOT%\Wallpaper.jpg\” $_.FullName -Force -Verbose }”


It is basically replacing all of the built-in Out of box wallpapers with my wallpaper.

PackageAware drivers for your printer are missing and you need a workaround!

This issue occurred when you install the Security update for Windows “Security Update for Windows Print Spooler Components” (3170005).

Download the correct KB for your Windows version in the links below:
Windows 10 1607 supportive technique information 3194798
Windows 7 and Windows Server 2008 R2 supportive technique information 3192403
Windows Server 2012 supportive technique information 3192406

Best practice is to use “PackageAware” drivers for your printers!
Take note that you should not do this workaround because you are lazy and don’t download a new printer driver that is “PackageAware” approved. ??
You find similiar lines inside your *.inf files if your driver is PackageAware approved.
[PrinterPackageInstallation.amd64]
PackageAware=TRUE

Configuring Group Policy to add print servers to allowed list.
Right-click on [START-menu], click [RUN] and type gpedit.msc and then click [OK].

Go to [Printers] and double-click on [Point and Point Restriction]

Set to [Enabled], and then configure these steps below that works for you. Then [Apply] and [OK].

Now in the same [Printers] policy folder double-click on [Package point and print – Approved servers].

Set to [Enabled] and then click on [Show].

Enter your “Fully Qualified Server Name” and then click [OK]. Click [Apply] and [OK] on the [Package Point and print] page.

DONE!

If you are not in a domain just restart your client and control that your setting has taken effect.
If you use a domain then push the policys and control your settings has taken effect.

Media not found “Please reinsert the media (CD, DVD, or USB) needed to complete the deployment.”

If you are using MDT and have created a Offline USB-drive Media for your Windows install, then this screen can appear because of the delay from Device Manager and the hardware scan to find the USB controller when the computer restarts.


Hold your horses, there is a workaround… !!


The workaround is to put a delay in the Litetouch.wsf script, presented below.
Copy the code below and put it into your Scripts\Litetouch.wsf:
‘//—————————————————————————-
‘// FIX for locating USB Deployment Media
‘//—————————————————————————-
‘Delay search for media 10 seconds.
Wscript.Sleep 10000
‘Device Manager action: Scan for Hardware …
sCmd = “c:\Windows\System32\rundll32.exe cfgmgr32.dll ,CM_Reenumerate_DevNode”
‘Delay for 5 seconds to allow hw to ennumerate
Wscript.Sleep 5000